
These actions implement a means to retain and update Finder Tags on your audio tracks. The metadata is retained in a custom field named Finder Tags. A preference list is used to retain a list of tags that you are using. This preference list must be configured prior to running any of the actions. The actions will terminate if the list is not configured.
There is also a custom edit panel which is available to display the Finder Tags field and provide quick access to the actions. Note that this custom panel is optional ... but you will more than likely want to have the field on a custom panel. You can add the field to one of your own panels, or create a new one if you wish.
Starting in Yate v6.17, Finder tags can optionally be read whenever an audio file is loaded and written when ever an audio file is saved. This is an optimal no brainer usage model as it does not require an action to be run. However, the associated preference list will not automatically be filled if you set your Finder tags in the Finder as opposed to using the field in Yate.
Configuring the Preference List Mapping
Installing the Custom Edit Panel
Working With the Finder Tags Field
Fill the Finder Tags Associated List
Set Folder Tags Based on Loved and Disliked
In Preferences - Lists - List Mappings you must map the Finder Tags custom field to one of the preference lists. You do this after installing the actions. The custom field will have been imported when you imported the actions. The following screenshot shows the field mapped to the Custom 2 list. Note that Auto-Saves and Autocompletes have been enabled. This will make it easier to use the field.
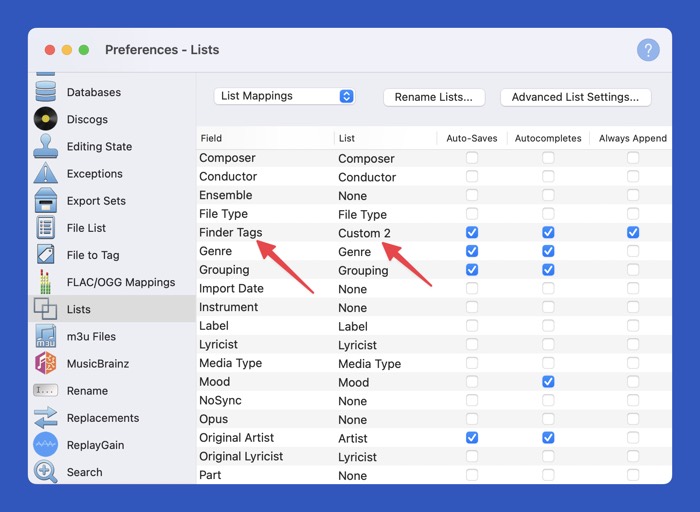
While not required, you can rename the list to something more meaningful than Custom 2. On the same Preference panel you can hit the Rename Lists button to rename the list.
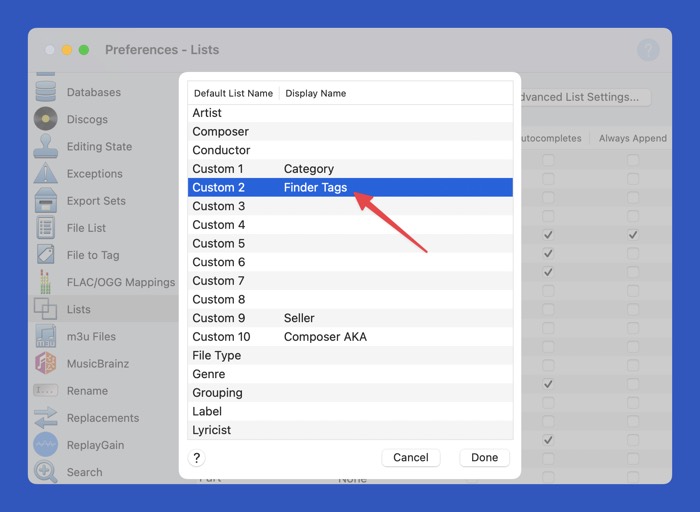
After renaming the list your mapping will look as follows:

At this point you have configured the required mapping of the Finder Tags field to a preference list. Note that you can rename the list at any time. However, if you change the list which is mapped, the actions will lose access to any items you've accumulated.
As mentioned in the introduction, the custom edit panel is optional. However, if you do not have the Finder Tags field displayed on an edit panel, functionality will be lost.
The first time you run any of the actions, you will be asked if you want to download the custom panel. If you elect to download the file, the downloaded file will be named Finder-Tags-Edit-Panel.zip. You can install the custom edit panel (which will be named Finder Tags), by dragging the zip file to the main window's file list area. The custom panel can be found at any time in the Templates section of the web resources page.
When you install the edit panel, or the actions for that matter, you may be asked to confirm the creation of the Finder Tags custom field. If asked, you should import the field.
Once the edit panel is installed you can display it at any time by right clicking on any edit panel preset button in the main window.
The list can be maintained completely automatically by the actions and your probable workflow. However, if you want to easily delete or edit items in the list, you can do so in Preferences - Lists - the name of your list.

You can quickly find this panel by clicking on the function button to the left of the Finder Tags field and then selecting Edit List.
The Finder Tags field, is a multi item field where each item is separated by the Multi Value Delimiter, typically (;;;).
You can manually enter data or use the menu button to the right of the field to append or overwrite the current value. If the field contains a ;;; delimiter, items selected in the menu will automatically be appended. When appending, the text in the field will appear as green. If the field does not contain a ;;; delimiter, the tag will overwrite the field unless the Option key is held before displaying the menu. The Preferences - Lists - Mappings panel has an Always Append column. If you enable this item for your list, the append made will always be enabled. This is useful for list such as the Finder tag list where you more than likely always append to a field as opposed to overwriting the contents. The field can always be manually cleared.
If you enabled Auto-Saves when mapping the field to the list, all new items will automatically be saved to the preference list. Note that preference list items are case insensitive. The alphabetic case of the item, as it appears in the list, will not be modified by editing the field. Whenever you write the field to the Finder, the alphabetic case will be standardized on the representation in the list. If you want this to happen automatically when editing the field, go to Preferences - Lists - Advanced List Settings and enable the Standardize on list items when typing option. Again, this is optional as the standardization will occur when you write the field to the Finder.
If you decide that an item is not capitalized correctly there are two ways of fixing the issue. The first is to manually edit the list. The second can be done while editing a field. Correct the alphabetic case and without exiting the field, select the Add to Field menu item from the function button to the left of the field. The Add to Field function enforces the alphabetic case as it appears in the field.
Other list oriented functionality can be performed by the function button to the left of the field (currently yellow in the above image). More information can be found in the The Current Selection, the Editing State, Red Light Green Light and What's With All Those Round Coloured Buttons? topic.
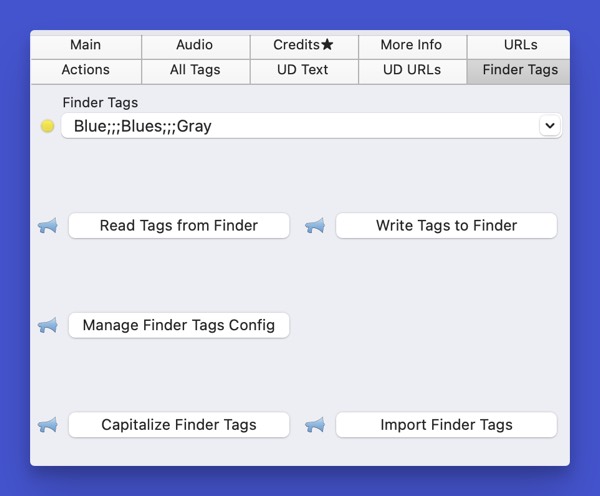
Most of the actions associated with this suite, can easily be accessed via the Finder Tag field's function button on the Multi Field Editor Actions submenu. In the image above, the relevant function button is currently yellow.
The Read Tags from Finder action will read the current Finder tags for all tracks and save them to the Finder Tags field. The associated preference list is updated.
Note that the contents of the Finder Tags field will be completely overwritten.
The action is written such that it can be invoked from pretty much anywhere. This includes from the Multi Field Editor as long as the Finder Tags field is selected. It can also be called from the field's function button's Multi Field Editor Actions submenu. The action is designed to run in the UI not the batch processor.
The Batch Read Tags from Finder action is essentially the same, except that it is designed to run the batch processor. You supply a folder path and optionally can clear the list associated with the Finder Tags custom field before starting. The batch processor will automatically be launched. If you want to avoid confirming the running of the batch processor you can enable the Enable Batch Processor auto start from Stop Action and Run Batch Processor setting in Preferences - Actions - General.
The Read Tags from Finder action updates the associated preference list. If for any reason you want to manually update the list, you can do so at any time with this action.
The Write Tags to Finder action will write the tags in the Finder Tags field to the Finder.
Note that all Finder tags are overwritten.
When the action is called, all duplicates will be removed and the alphabetic case of the tags will be standardized to the representation in the preference list. After the tags are written to the Finder, they are read back from the Finder to ensure that the representations are identical.
The action is written such that it can be invoked from pretty much anywhere. This includes from the Multi Field Editor as long as the Finder Tags field is selected. It can also be called from the field's function button's Multi Field Editor Actions submenu.
Note that the writing of Finder Tags can automatically be performed based on settings in Settings - General - Finder Tags. These settings can also enable the writing of specific Finder tags for Liked and/or Disliked.
The Capitalize Finder Tags action will capitalize all tags in the preference list.
If any audio files are selected, their associated Finder Tags field will be standardized on the possible new representations.
If you want to sort the Finder Tags field, you can do so with this action.
The Import Finder Tags action can be used to import the names of Finder tags from a text file. The tags should be placed one per line in the file. Empty lines, leading and trailing spaces and duplicates are ignored. Sequences of whitespace characters are changed to a single space. (tab characters are replaced).
The action prompts for the name of a .txt file which contains the names of the tags to be imported. At the bottom of the panel is an option named Remove existing tags. When the option is enabled, all existing tags will be removed prior to the import. Note that there is no need to include the Finder's standard colour tags in the file as they are automatically added after the import. If the Remove existing tags option is not enabled, all tags in the file will be added to the list. The alphabetic case representation of items in the file will be enforced.
If any audio files are selected, their associated Finder Tags field will be standardized on the possible new representations.
Yate v6.17 introduced the ability to read and write Finder tags on audio files without the running of actions. If you want to set tags on an audio file's containing folder, an action is still required.
The Set Finder Tags suite of options had an an earlier action to do so. This action has a slightly different take which sets one or two coloured Finder tags on a folder to show the accumulated loves/dislike settings of the contained audio files. When contained tracks are loved and disliked, two tags will be set.
The Manage Finder Tags Config action is automatically run the first time the action is run. The config action is only run once, unless it is directly run or the Option key is pressed when this action is started.
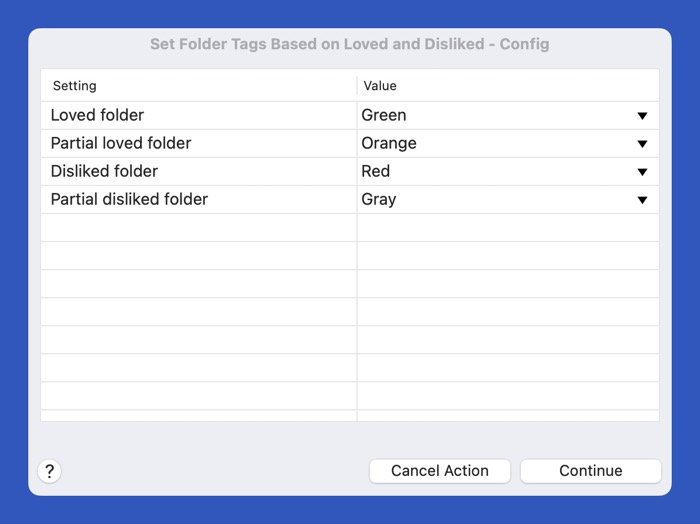
There are four tags which can be specified and all are optional but at least one must be specified.
The Loved folder tag is set if all audio files in the contained folder are loved.
The Partial Loved folder tag is set if at least one but not all audio files in the contained folder are loved.
The Disliked folder tag is set if all audio files in the contained folder are disliked.
The Partial Disliked folder tag is set if at least one but not all audio files in the contained folder are disliked.
Up to one loved and one disliked tag can be set. While any Finder tag can be set, the visual coloured ones provide the best visibility. Existing Finder tags other than the possible four that are specified are not modified.
Actions:
Folder: Manage Finder Tags
Capitalize Finder Tags
Manage Finder Tags Setup
Import Finder Tags
Read Tags from Finder
Fill the Finder Tags Associated List
Batch Read Tags from Finder Helper
Batch Read Tags from Finder
Sort Finder Tags
Write Tags to Finder
Manage Finder Tags Config
Set Folder Tags Based on Loved and Disliked
Custom Field Mapping Data for:
Finder Tags
Requirements:
Yate v6.20.0.1
History:
| Date | Version | Information |
|---|---|---|
| 2016-07-03 | v1.0 | First release. |
| 2023-08-07 | v1.1 | Changes for Yate v6.16.2 |
| 2023-08-23 | v1.2 | Added Sort Finder Tags |
| 2023-10-05 | v1.3 | Remove the 'sort' configurable item. New actions added. |
| 2024-08-20 | v1.4 | Renamed the config action to align with the associated edit panel. |